September 16, 2004

Peter Koller is a dedicated Hardware and Software engineer of more than 24 years experience in the design of computers, their software, and their interface to the real world. After a false start in France, the company Maison Anglais was finally registered in the UK. The name Maison Anglais was used in various spellings to promote software products since 1995.
If you have a comment about the content of this article, please feel free to vent in the OS/2 e-Zine discussion forums.
There is also a Printer Friendly version of this page.
|
Previous Article |
|
Next Article |

Bitmaps and Maul
Editor's Note: This article was written by the author of the software application which is discussed. OS/2 e-Zine has no relation with the author. I personally also have no relation, my only link is that I purchased a copy of Maul (and very happy with it) a couple of years ago. And now, onto the article...This article is a follow up to Maul Publisher - An Introduction, published in an earlier issue of OS/2 ezine. I am the developer of Maul Publisher, but much of this article is of broad interest to everyone.
We all use bitmaps every day. With the advent of high quality digital cameras, and the very high resolution
that they produce, people have an opportunity to snap hundreds of images without the cost and hassle of having to buy
film and pay the development costs.
Part 1 - The trouble with Bitmaps
The trouble with Bitmaps is that if you are not aware of how they work with your computer and printer, you cannot get the best out of the digital images you have taken. The issues are as follows:-
- What happens when bitmaps are scaled.
- How do images get captured by a camera or scanner.
- What happens when printing a bitmap.
- Why don't the colours match.
What are bitmaps?
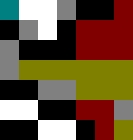
A Bitmap is a series of coloured dots
At its most crude, a bitmap is a series of coloured dots arranged to cover a rectangular area. Each dot is specified by a number. The bigger the range of numbers available for each dot, the more precise the colour rendition. Most so called 'True colour' bitmaps use 24 bits for each coloured dot (24 bits per pixel). Those 24 bits are split into 8 bits of red, green, and blue colour values, giving 255 levels of brightness for each coloured dot. This is (only just) enough to match the colour resolution capability of the human eye.
The bitmap above represents an image of 8 dots wide and 7 dots high. If we say the above image is about an inch square then its resolution is only about 8 dots per inch (8 dpi). Notice that if you change the size of the image, you also change its resolution, providing more, or fewer dots for every inch.
Bitmaps come in many file formats. Some of the most common include *.bmp, *.jpg, *.gif, and *.png formats. In essence, they are all bitmaps, although some of these formats compress the image data in various ways to take up less space. If you are going to do much in the way of image manipulation, you should first convert the bitmap to the uncompressed *.bmp format. If you edit a *.jpg file, you will find that your image can rapidly degrade.
It is worth noting that whatever format a bitmap image is stored in, the bitmap needs to be uncompressed in memory before the operating system can print or display it. This means that compressed bitmap image formats are great for transport and storage, but no good for display or manipulation.
What happens when bitmaps are scaled?
The resolution of a computer screen is around 96 dots per inch. What happens when the bitmap is scaled so that the dots in the bitmap no longer line up with the dots on the screen? Well, if the bitmap is enlarged lines of dots have to be added in order to fill the gaps.
A number of techniques are available when you need to create a missing dot. One trick is to take the average colour of all the surrounding dots. There are up to 8 of them available around the missing dot. If this was a movie (a series of bitmaps), you could use the previous and next images as well, to get an average from up to 26 adjacent dots (work it out!).
As this uses a fairly lavish amount of processing power, the average is often only taken from 2 dots, either from the left and right, or from above and below. However it's done, the image ends up looking slightly blurred, particularly if your bitmap contains fine lines like the ropes on a boat mast. The fine lines turn into fat lines and go kind of lumpy and uneven looking.
Alternatively, the bitmap painting process can ignore averaging out colours, and just print the same line of colours as double width. What you get then looks blocky, as in the image above, but often this is more pleasing on the printed page than the blurred alternative.
When you shrink a bitmap to fit into a screen area, another problem arises. Individual dots must be removed. They can either just be deleted, or the system can make some kind of attempt to fake up something to hint at the missing dots. With font smoothing, for example, a gray dot is used to hint at the existance of a half sized black dot;- The eye is easily fooled.
How do images get captured by a camera or scanner?
The scaling problems mentioned above also work in reverse, a digicam uses a seres of sensors, and fine lines in the image coming from the lens can fall between sensors.
Worse is to come. Screens, scanners, cameras, and printers, all use separate fixed colours to read or display an image.
Imagine that you take a picture of a thin white vertical line. If the line is thin enough, it might only register on a line of red sensors. The white line is red in the resulting bitmap. On the positive side, sensors are not often arranged in neat vertical rows, and very few natural subjects have thin lines in them.
When the bitmap is displayed on the screen, or printed to a printer, each screen dot, or printer ink dot, will be made of just one part of the colour in the original bitmap dot. To confuse the issue some more, the screen uses red, green, and blue dots, and so do scanners and cameras. Printers, on the other hand, use yellow, magenta, cyan, and black inks. To properly display a bitmap in all its glory, you need at least three dots on the screen, and four dots on the printer, for each dot on the bitmap.
What happens when printing a bitmap?
When you print a bitmap, each dot in the bitmap needs to be made up of a series of coloured ink dots. The ink dots are only available in 4 colours and cannot readily be printed on top of each other. So called colour diffusion patterns are used to determine where the ink dots are printed.
Let me spell it out for you:- A 300dpi printer can produce good colour rendition at up to around 75dpi! You can go up to 100dpi without too serious a colour degradation. Gray scale bitmaps ought to be able to print right up to 300dpi, depending on how well the printers black ink nozzles can be positioned.
The brightness range of eack ink dot is dependant on how much or how little ink gets squirted onto the paper by the print head. On some printers the brightness is varied by altering the number of dots printed, not by altering the amount of ink. This can make such specifications as 4800dpi irrelevant - colour diffusion patterns can reduce that to a colour resolution of only 100dpi or less.
Virtually no printer exists today that can accurately cover the 255 brightness levels required. Also, ink by its very nature will not have a perfect colour, and that colour will change slightly as the ink dries. Some printers use two sets of inks to improve the colour brightness range. The OS/2 printer driver you are using can seriously affect how well this works in practice.
The paper also plays a role. Too thin, and it won't absorb enough ink, too thick, and the ink may spread too far into the paper fibres.
Why don't the colours match
Most interesting, there is a reversal of the way that colours are created. On a TV screen, the red green and blue dots are left off to produce black. This can be represented with the number 0,0,0.
On the printer, this is equal to the maximum of cyan, magenta, and yellow inks all mixed together, i.e. 255,255,255. Because we have a black ink, all values common to cyan, magenta, and yellow are printed as black. Now, our number looks like this:- 0,0,0, 255(for black).
From the above example the colour white, 255,255,255 on the screen, becomes 0,0,0,0 on the printer. In other words, the screen is black by default, and the page is white by default:- The use of colours is reversed.
Now lets take the colour red. That would be 255,0,0 in red green and blue (also known as RGB), and 0,255,255,0 in cyan, magenta, yellow, and black (called CMYK). We need to mix magenta and yellow inks together to produce red on the paper. Here, this colour wheel should help:-
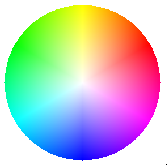
A lighter red would demand less ink, and a darker red can be achieved by adding some black.
You can convert from primary colours (RGB) to secondary colours (CMY) quite easily:-
- cyan = 255 - red;
- magenta = 255 - green;
- yellow = 255 - blue;
...notice how you are jumping across to the opposite side of the colour wheel!
The minimum common colour of the above three represents black, and once you have deducted black from the equation, you find that every colour is represented by black and just 2 of the 3 remaining colours.
Its no wonder if the colours printed on the paper don't match too well what you see on the screen.
Every computer device that reads or displays a bitmap makes up its colours out of a set of at least three colours, or three colour sensors. There is very little variation in modern devices, but there is some, and it all comes to a head at the printer. OS/2 is a fairly old system these days, and regretfully inbuilt colour management is missing. It was designed for the days when we used 256 colour vga displays, and it is very effective at creating a wide range of shades from such few colours. But what arrives at the printer looks nothing like the bright and colourful images from your camera.
The most important problem to address is the printer. The solution is of course to develop and use printer drivers that can use colour matching profiles. I have no idea of how or where one might begin to find suitable colour profiles. They exist for Windows, but would OS/2 developers be able to use these without running into copyright problems? And how do they work? If anyone has any thoughts on this subject, please email me!
Part 2 - Maul Publisher and Bitmaps
Believe it or not, Maul Publisher provides some unique solutions to a number of the problems explained above. This application is designed from the ground up to properly deal with printing. Here are a few of the most important features:-
- Accurate image placement.
- Precise bitmap scaling.
- Powerful colour adjustment tools.
- A method for managing a large number of bitmaps in a single file.
- Colour separation and colour correction.
Accurate image placement
Maul will position images on a page accurate to a single printer pel. It can do this because the whole application works by using the coordinate space of the selected printer. It is important to note that when dealing with bitmaps, high accuracy is not the same as the right accuracy.
Because bitmaps print best when they are not scaled at all, or are only scaled by a fixed amount, a rounding error of a single pixel can make the resulting image look ugly. This is of particular concern when printing computer screen shots as these are always full of fine lines, and suffer really badly from inappropriate scaling.
Precise bitmap scaling
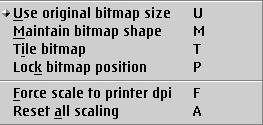
The bitmap handler edit menu provides you with the basic tools necessary to get exactly
scaled bitmaps
If you select 'Use original bitmap size', and then select 'Force scale to printer dpi', Maul will work out the most suitable scale factor of this image for your printer. Due to colour separation effects, this is usually either 300 or 400 percent, giving the printer driver enough space to separate colours into individual ink values. This trick can produce some stunning printed image quality.
The bitmap handler also provides a menu item to allow you to crop the containing frame down to the size of the bitmap. This only works once the bitmap scale is fixed by the 'Use original bitmap size' menu item. By default, the bitmap is scaled to the frame, not the other way round.
Powerful colour adjustment tools
The bitmap handler also provides an in depth set of tools to manipulate the bitmap image itself. Of special interest
for printing is the image colour tuning dialog:
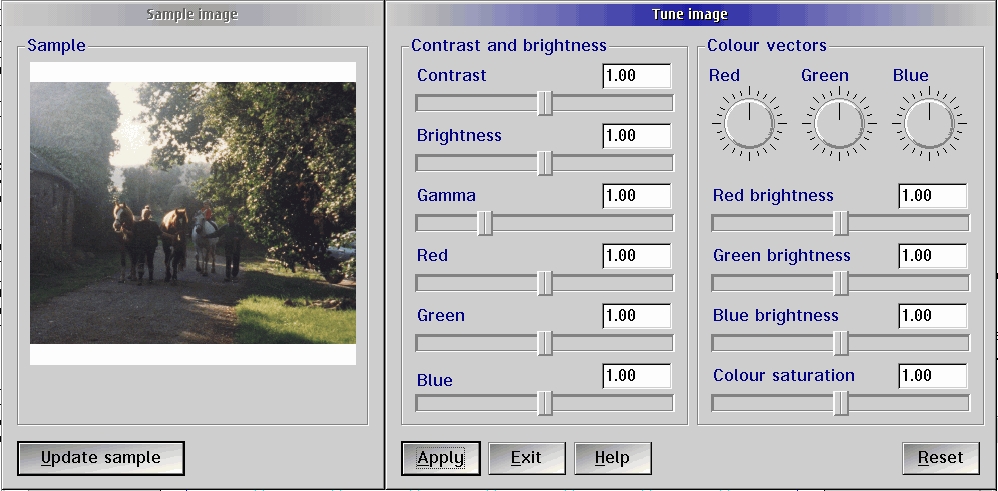
Handles, levers, and pulleys! (click to get full-size image)
The rotary colour vector controls are especially useful for rescuing image colours when all other applications have failed. These controls are capable of shifting the basic tone of a set of colours while leaving the overall colour cast of a picture intact. Here is your 'one stop shop' for improving the quality of your printed images.
The same controls can also be used for special effects such as black and white, or sepia toned images.
A second dialog provides you with an accurate tool to crop your pictures. You can maximise the cropping dialog to get a better view of the image to crop.
In a future enhancement, tools will be added to the bitmap handler to perform rotation and mirroring of bitmap data. This is already possible within Maul itself using the inbuilt scaling and rotation tools, but this doesn't convert the actual bitmap data, so you can't rotate a bitmap in Maul and copy it out again in its rotated form. At least not yet, anyway.
A method for managing a large number of bitmaps in a single file
Imagine the scenario. You want to create and print a family photo album. You have nearly 50 high resolution (about 15 Mb each!) scanned images you want to print in a single document, with page numbers.
Before you start a new publication in Maul, go to the 'Options'->'Global style settings' dialog, and enable the 'Store big bitmaps offline' checkbox.
As you start to load images into your publication, you will notice that the images appear a little rough, and only take up around 500 kb each in the publication. What Maul is doing is substituting a rough sketch of the image in place of the real thing. The real images are saved in a folder with the same name as your publication.
By using backup images, Maul is also able to maintain full undo and redo for any changes you make to the images. When you copy an image, you get the full image on the clipboard, not the rough sketch. In fact, Maul treats the full image files as if they were actually part of the document.
This means that you can edit the picture titles, add page numbers, and so on, without the editing process slowing down to a crawl. If the file still ends up too large, you can start a new publication and number the pages from where the last publication document ended.
The real killer feature comes into effect when you print. As each image is printed, the application momentarily swaps each full sized image into memory in turn, and prints it at its full resolution. This enables Maul to directly print large photo albums in one go! Combine this with the ability to manage double sided printing, and you have a set of features unmatched by any other OS/2 application (and most Windows ones too!).
Colour separation and colour correction
Maul has one more trick up its sleeve. Before every object is printed, be it a bitmap, a metafile, or text, its colour is processed by a colour separation handler. Maul itself is thus theoretically capable of applying a colour profile for a particular printer.
I would be quite surprised if many people use the colour separation feature built into the application. Nevertheless, it does provide a very neat proof of concept for colour correction. In this vein, a set of colour channel gain controls are also provided. Look in the menus under 'Options->Colour options->Colour print options...'.
These controls adjust the actual secondary colour ink values fed to the printer and are therefore
capable of quickly improving a printout where a particular colour cast is apparent.
|
Previous Article |
|
Next Article |